Custom Search

Saturday, January 1, 2011

18-button joystick mouse


WarMouse Meta: the 18-button joystick mouse

Oxford, England, December 15, 2009 - WarMouse today announced that its revolutionary 18-button joystick mouse, rechristened the Meta, will ship with a high-resolution laser sensor instead of an optical sensor. With a patented design featuring 18 buttons, an analog joystick, and a 5600-cpi laser sensor, the Meta provides a radically efficient user interface that has been shown to increase mouse input speeds by an average of 30 percent in comparison with conventional two-button mice utilizing toolbar icons and pull-down menus. Initially introduced as the OpenOfficeMouse, the WarMouse Meta also has 512k of flash memory, which allows it to completely change its functionality in different games and applications.
"We were frankly shocked by the overwhelming response to our original announcement of the mouse," said Theodore Beale, Lead Designer at WarMouse. "We sent out three emails and ended up getting three million hits on our website that weekend; no one seemed to believe that an 18-button mouse with a joystick could be anything but a joke. But it's real, it's brutal, and it's going to fundamentally change what people expect of their input devices. There are some of the opinion that the Meta is insane, but we believe there are many gamers and power users who want to be able to do more than stroke their mouse with two fingers."
The Meta is one of the first computer mice to incorporate an analog joystick and is the first mouse to permit the use of the joystick as a digital keyboard interface. In the three digital joystick modes, the user can assign up to sixteen different keys or macros to the joystick, which provides a very fast interface regardless of whether the user is flying through the cells of a large spreadsheet in Calc or on the back of an epic flying mount in World of Warcraft. In analog joystick mode, the player can select between having up to seven joystick buttons available or using all 18 buttons as keyboard and mouse commands instead.
The features of the WarMouse Meta include:

  • 18 programmable mouse buttons with double-click functionality
  • High-resolution laser sensor with adjustable resolution from 100 to 5,600 DPI/CPI
  • Five assignable button modes: Key, Keypress, Macro, Mouse, and Mouse-Key Combo
  • Analog Xbox 360-style joystick with five analog and digital modes
  • Clickable scroll wheel
  • 512k of flash memory
  • 63 on-mouse application modes with hardware, software, and autoswitching capability
  • 1024-character macro support
  • Meta Modeware for creating, managing, and customizing game and application modes
  • Import and export of custom modes in XML format
  • Optional audio notification of mode switching with customizable wave files
  • Taskbar display of active application mode
  • PDF export of application mode button assignments
  • Graphical pop-up map of application mode button assignments
  • 25 default modes for popular games and applications, including Mozilla Firefox and Thunderbird, Microsoft Word, Excel, and Powerpoint, OpenOffice.org Writer, Calc, and Impress, 3D Studio Max, Autodesk AutoCAD, Adobe Photoshop, the Gnu Image Manipulation Program, World of Warcraft, Call of Duty: Modern Warfare 2, and the Multiple Arcade Machine Emulator
  • Chris Park, the lead designer of the popular independent strategy game AI War: Fleet Command, remarked: "I've been using a 5-button mouse for many years now, and there was once a time when I thought I'd never need more than two buttons -- I shudder at the thought, now. So I'm interested to see how the Meta handles in practice when I actually get my hands on one. The thing that most interests me is the analog stick on the side of it. For AI War, I imagine that this would make panning much simpler, and it could be really handy for panning in other applications, as well. It is a feature that seems to fit tidily on the side of the mouse and which I could see eventually becoming as indispensable as the fourth and fifth buttons on my current mouse."
    The WarMouse Meta (blue buttons)
    The WarMouse Meta has been alternately described as "the most insane mouse ever", "a Photoshop gag", and "too much of a good thing". For more detailed information about the Meta visit the Meta specifications page at WarMouse.com. The Meta is compatible with Windows, Linux, and Macintosh operating systems and will retail for $74.99 in the first quarter of 2010. For More information : http://warmouse.com/pr121509.html

Read more...

Wednesday, May 12, 2010

Play cricket in online with real feeling

Play cricket in online with real feeling

Online cricket game from Cricinfo - choose your team, your opponents, the venue and off you go.

http://slogout. cricinfo.com

Take a look at everything in our Pavilion including Ashes fixtures, npower girls

Twenty20 cricket, npower Village Cup and videos!


http://cricket.npower.com

Play free online flash games. Includes action games, dress up games, board, card games myspace games and more.

www.gamesjockey.com

Games2Win, top 20 online gaming businesses in the world, offers some of the best free online games for girls & boys including fun, car, fashion and dress

www.games2win.com


* www.flashcricket.com

* w ww.coverdrivecricket.com

*http://howzat.com

*www.games2win.com

*http://fantasy.cricinfo.com

*http://games.sify.com

Read more...

Car Steered with Driver’s Eyes

Car Steered with Driver’s Eyes

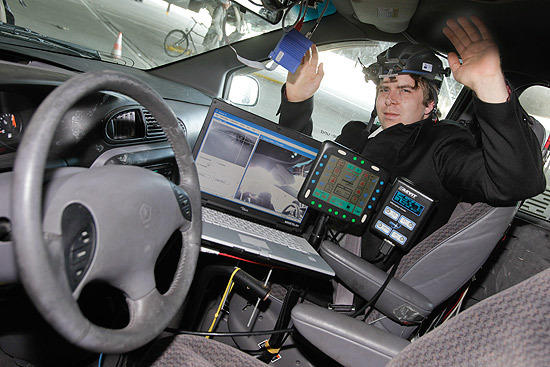
Source: Christian Kielmann"> The vehicle is controlled solely by the eye movements of the  driver.
The vehicle is controlled solely by the eye movements of the driver.
Source: Christian Kielmann
Source: Christian Kielmann"> Cameras mounted on the helmet  capture the eye movements of the  driver, which are converted into control signals for the steering  wheel.
Cameras mounted on the helmet capture the eye movements of the driver, which are converted into control signals for the steering wheel.
Source: Christian Kielmann
Source: Christian Kielmann"> Raul Rojas is a professor of artificial intelligence in the  Department of Computer Science at Freie Universität Berlin.
Raul Rojas is a professor of artificial intelligence in the Department of Computer Science at Freie Universität Berlin.
Source: Christian Kielmann
Source: Christian Kielmann"> In the AutoNOMOS project Prof. Rojas and his team are working on  the further development of autonomous and semi-autonomous cars.
In the AutoNOMOS project Prof. Rojas and his team are working on the further development of autonomous and semi-autonomous cars.
Source: Christian Kielmann
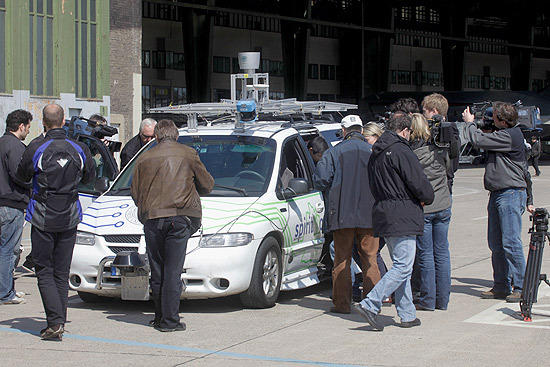
Source: Christian Kielmann"> Over 60 journalists from around the world attended the press  screening.
Over 60 journalists from around the world attended the press screening.
Source: Christian Kielmann

Demonstration by Computer Scientists of Freie Universität at Former Tempelhof Airport

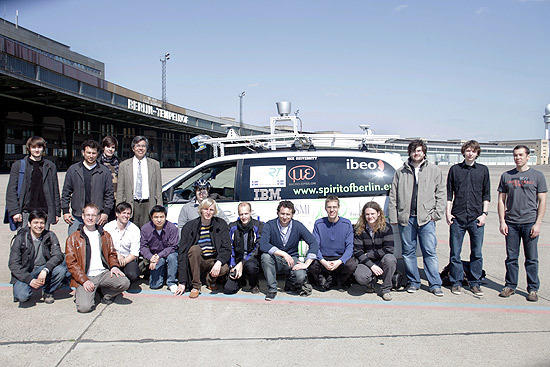
“Keep your eyes on the road!” – Today scientists at Freie Universität working under the computer science professor Raúl Rojas gave a completely new meaning to this standard rule for drivers: Using software they developed, they can steer a car with their eyes. Today on the site of the former Berlin Tempelhof Airport, the head of the project, Raul Rojas, and his team from the Artificial Intelligence Group demonstrated how they can steer the vehicle that is equipped with complex electronics just by eye. More than 60 journalists from around the world were there to watch. A video, photos, and other information can be viewed in the online magazine of Freie Universität, campus.leben.

Information about the Software: EyeDrive

The eyeDriver software is a prototype application for steering the research vehicle Spirit of Berlin using eye movements. The software was designed by computer scientists at Freie Universität Berlin in collaboration with the company, SMI (SensoMotoric Instruments). The eye movements of the driver are collected and converted into control signals for the steering wheel. The speed is controlled separately and is not included in eyeDriver. The software shows that you can drive a vehicle solely with eye movements.

The HED4 solution by SMI is used for detecting and tracking the eye movements. It is a converted bicycle helmet equipped with two cameras and an infrared LED, as well as a laptop computer with special software. One of the cameras is pointed to the front in the same direction as the person wearing the helmet (scene camera), while the other camera films one eye of the wearer (eye camera). The infrared light supports the eye camera and is pointed to the eye under observation. A transparent mirror that reflects only the infrared light is used to allow a reasonable viewing angle for the eye camera, without limiting the wearer’s ability to see.

After a brief calibration the software on the laptop of the HED4 is not only able to capture the position of the pupil in the eye camera, but can also calculate the position in the scene camera that the wearer is looking at. These coordinates in the image of the scene camera (viewing position) are transmitted via an ordinary LAN to the onboard computer in the Spirit of Berlin.

The eyeDriver software in the onboard computer in the Spirit of Berlin receives the viewing positions at regular intervals over the LAN in the vehicle and uses it to control the steering wheel. The driver can choose between two modes: “free ride” and “routing.”

In the “free ride” mode the viewing positions are linked directly with the steering wheel motor. That means that the x-coordinates of the viewing position are used to calculate the desired position of the steering wheel. The further the driver looks to the left or right, the further the steering wheel is turned in that direction. The speed of the vehicle is set in advance and kept constant, as long as the position of the gaze is recognized. In case it is not possible to detect which direction the driver is looking in, for example, if the driver’s eyes are closed, the vehicle brakes automatically.

In the “routing” mode, the Spirit of Berlin steers autonomously most of the time. Only where there is a fork in the road, or an intersection, the car stops and asks the driver to select the next route. This requires the wearer of the helmet to look to the left or right for three seconds. If the driver’s gaze lingers long enough in one direction, the eyeDriver software confirms acoustically that the choice has been accepted. The decision is communicated to the planner in the vehicle. Then the artificial intelligence in the Spirit of Berlin can plan the route accordingly and continue to run independently.

For more information :

www.fu-berlin.de/en/presse/fup/2010/fup_10_106/index.html,

www.youtube.com/watch?v=0zbrySJVQ5A


Read more...

Passenger Elevator Trick !

Passenger Elevator Trick !


This is usefull for those who often use elevators !


When we press the floor no. button on the panel lift start moving. But if someone on the next floor calls the lift the lift stop for them, this could be very irritating in rush hours !


Now, if you Press the Floor No. Button and the Close Door Button both at same time then the elevator would not stop for any one in the way and will stop directly on the destination floor !


** Note in some elevator systems this trick might not work !

Read more...

LOCK YOUR FOLDERS


LOCK YOUR FOLDERS


You can lock and unlock your folder with this simple trick !


Procedure :
1. Make a folder on the desktop and name it as "folder"


2. Now, open notepad and write ren folder folder.{21EC2020-3AEA-1069-A2DD-08002B30309D} and now (Notepad Menu) File>save as.


3. In the 'save as' name it as lock.bat and click save ! (Save it on Desktop)


4. Now, again open notepad again and write ren folder.{21EC2020-3AEA-1069-A2DD-08002B30309D} folder and now (Notepad Menu) File>save as.


5. In the 'save as' name it as key.bat and click save ! (Save it on Desktop)


6. Now, double click lock.bat to lock the folder and now if you open your folder, control panel will open up !


7. Now, double click key.bat to open the folder and now if you open your folder, you can access your data inside the folder again !


8. Lock your folder and hide the key.bat somewhere else on your hard disk !


9. Whenever you want to open your folder just paste the key.bat on desktop and open your folder using it !

Simple !

Read more...

Download Free Cell Phone Videos (3GP) With Google

Download Free Cell Phone Videos (3GP) With Google

Do you want to download a bunch of free videos for your cellular phone? This technique will show you how to search Google to find tons of open directories containing free cell phone videos. No P2P or torrents required. Start your collection from the open collections of others.

This time we will be using a Google search to find people’s open directories of 3GP videos. This is a common video format used to view videos on cell phones.
1. Open Directories of 3GP files:
Google: -inurl:htm -inurl:html -inurl:asp intitle:”index of” 3gp
2. Specific Searches for 3GP files:
Google: filetype:3gp inurl:3gp
Now this search is not nearly as sexy as it brings in a ton of junk. However, this search casts your net wider. The magic here is the filetype and inurl filters telling google to only include these video files in your search. By leaving these filters in place, you can add more search terms to narrow your search.
For example, to search 3GP video files that are associated with rock.
Google: filetype:3gp inurl:3gp rock

Read more...

Add “Hide File Names” Option in “View” Menu in Windows Vista

Add “Hide File Names” Option in “View” Menu in Windows Vista

Guys with this 4 simple steps you can add Hide File Names Option in View Menu in your widows Vista...... this trick works only with Windows Vista.

1. Open a folder, in which you want to add this option. If you want to add this option in all folders, then open the parent folder. e.g. if you want to add the option in every folder of E: drive, then open E: drive.

2. Right-click on a blank area in the folder and select “Customize This Folder". You can also get this option from “View -> Customize This Folder.

3. It’ll open “Customize” tab. Now select “Pictures and Videos” option from “Template” drop-down box.
NOTE: If you want to add the option “Hide File Names” to a particular folder then make sure to un-check the option “Also apply this template to all subfolders“, otherwise enable this option.

4. Now Apply it and see the magic.
Now you’ll get an extra option “Hide File Names” in “View“. Which can hide file/folder names in that particular folder.Actually in Windows XP we can hide file/folder names by pressing key and selecting “View -> Thumbnails“. Since they hv removed “Thumbnails” option from “View” menu, I think thats why this option was added to folders having their templates as “Pictures and Videos”.

Read more...

Create a drive menu for My Computer

Create a drive menu for My Computer

Set My Computer to work like a menu for easier access to the drives you need.
By default, the My Computer item on the Start menu is configured to work like a standard folder window. If you need to access a specific drive, select My Computer from the Start menu, wait a moment for the window to appear, and then double-click the icon for the drive you need to access.
When you're in a hurry, this two-step procedure can be time-consuming and frustrating—especially if My Computer contains a large number of drive icons. However, Windows XP makes it easy for you to configure My Computer so it works like a menu, with each drive listed as a menu item.

Here's how.
1. click the Start button, and select Properties.
2. Click Customize, which is adjacent to the Start Menu radio button, and select Advanced.
3. Scroll through the Start Menu Items list box until you see My Computer.
4. Select Display As A Menu, and click OK twice.Now, when you select My Computer from the Start menu, you'll see a menu of individual drives. To access the contents of that drive, just select the drive letter from the menu.

Read more...

Add your own SideBar In Windows Xp !

Add your own SideBar In Windows Xp !

..Using Windows Xp ? Need a look similar to Vista ? need a sidebar which contains feeds about your favourite site , then you are in right place ..! We use a software called MediaTicker , an product from RoXio's to create your own sidebar . Your Sidebar will look similar to this ....!!


Follow these simple steps :
Download & Install this S/w: http://docs.sonic.com/labs/mediaTicker/roxiomediaticker21.exe

Now Open the software installed . It will automatically create a Sidebar for you .

Now to edit this sidebar , click options on the roxio sidebar . You will see this !

In the URL add the Feed of your favourite site . Now you Sidebar shows the Feeds from your favourite site , as indicated in the Sidebar above, which makes you not to visit the site , instead you can add in your desktop itself ...! You can place the sidebar anywhere in the desktop , by selecting the options !

Apart from the Favourite sites , You can also add your Favourite Pictures From your Pc as sidebar , which makes you to feel good ..!
Thats it your sidebar has been created and the look of your desktop will look like the Vista.


Read more...

How to use the Google calculator

How to use the Google calculator


Google’s calculator tries to understand the problem you are attempting to solve without requiring you to use special syntax. However, it may be helpful to know the most direct way to pose a question to get the best results. Listed below are a few suggestions for the most common type of expressions (and a few more esoteric ones).
Most operators come between the two numbers they combine, such as the plus sign in the expression 1+1.
Operator Function Example + addition 3+44 - subtraction 13-5* multiplication 7*8/ division 12/3^ exponentiation (raise to a power of) 8^2% modulo (finds the remainder after division) 8%7choose X choose Y determines the number of ways of choosing a set of Y elements from a set of X elements 18 choose 4 th root of calculates the nth root of a number 5th root of 32 % of X % of Y computes X percent of Y 20% of 150
Some operators work on only one number and should come before that number. In these cases, it often helps to put the number in parentheses.
Operator Function Example sqrt square root sqrt(9) sin, cos, etc. trigonometric functions (numbers are assumed to be radians) sin(pi/3)tan(45 degrees) ln logarithm base e ln(17) log logarithm base 10 log(1,000)
A few operators come after the number.
Operator Function Example ! factorial 5!
Other good things to know
You can force the calculator to try and evaluate an expression by putting an equals sign (=) after it. This only works if the expression is mathematically resolvable. For example, 1-800-555-1234= will return a result, but 1/0= will not.
Parentheses can be used to enclose the parts of your expression that you want evaluated first. For example, (1+2)*3 causes the addition to happen before the multiplication.
The in operator is used to specify what units you want used to express the answer. Put the word in followed by the name of a unit at the end of your expression. This works well for unit conversions such as: 5 kilometers in miles.
You can use hexadecimal, octal and binary numbers. Prefix hexadecimal numbers with 0x, octal numbers with 0o and binary numbers with 0b. For example: 0x7f + 0b10010101.
The calculator understands many different units, as well as many physical and mathematical constants. These can be used in your expression. Many of these constants and units have both long and short names. You can use either name in most cases. For example, km and kilometer both work, as do c and the speed of light.
Feel free to experiment with the calculator as not all of its capabilities are listed here. To get you started, we’ve included a few expressions linked to their results.
1 a.u./c56*781.21 GW / 88 mphe^(i pi)+1100 miles in kilometerssine(30 degrees)G*(6e24 kg)/(4000 miles)^20x7d3 in roman numerals0b1100101*0b1001
More info on:
http://www.google.co.in/help/calculator.html

Read more...

DIFFERENT WAYS TO SHUTDOWN YOUR PC

DIFFERENT WAYS TO SHUTDOWN YOUR PC

There are so many different ways to turn off your Windows XP computer, let's look at some of them:

1. The standard approach - click the Start Button with your mouse, then select the Turn Off menu and finally click the Turn Off icon on the Turn Off computer dialog. blink.gif

2. Press Ctrl+Esc key or the Win key and press u two times - the fastest approach.

3. Get the Shutdown utility from Download.com - it add the shut down shortcuts for you. Else create them yourself using approach 4.

4. Create a shutdown shortcut on your desktop. Right click on the desktop, choose New Shortcut and type shutdown -s -t 00 in the area where you are asked to specify the location of the program file. Now you can just double click this icon to turn off the computer. The best location would be your quick launch bar.

5. Press the Win key + R key to open the run window. Type shutdown -s -t 00. [s means shutdown while t means the duration after which you want to initiate the shutdown process].

If some open processes or application won't let you turn off, append a -f switch to force a shut down by closing all active processes.

6. Win+M to minimize all windows and then Alt+F4 to bring the Turn Off computer dialog.

7. Open Windows Task manager (by right clicking the Windows Task bar or Alt+Ctrl+Del) and choose Shut down from the menu. Useful when the Windows are not responding.

8. open task manager--->click on shutdown--->hold the ctrl key and click on Turn off::::::: pc will be turned off in 3 secs.. fastest method other than hard shutdown

Read more...

Change / Add Restrictions

Change / Add Restrictions

1.Open RegEdit


2.Go to HKEY_CURRENT_USER\Software\Microsoft\Cur

rentVersion\Policies

3.Go to the Explorer Key

4.Then right click on the right side pane and select "Create Dword".

Select appropriate value name from the list given below and enter 1 for enabling the value and 0 for disabling it

NoDeletePrinter - Disables Deletion of Printers

NoAddPrinter - Disables Addition of Printers

NoRun - Disables Run Command

NoSetFolders - Removes Folders from Settings on Start Menu

NoSetTaskbar - Removes Taskbar from Settings on Start Menu

NoFind - Removes the Find Command

NoDrives - Hides Drives in My Computers

NoNetHood - Hides the Network Neighborhood

NoDesktop - Hides all icons on the Desktop

NoClose - Disables Shutdown

NoSaveSettings - Don't save settings on exit

DisableRegistryTools - Disable Registry Editing Tools

NoRecentDocsMenu - Hides the Documents shortcut at the Start button

NoRecentDocsHistory- Clears history of Documents

NoFileMenu _ Hides the Files Menu in Explorer

NoActiveDesktop - No Active Desktop

NoActiveDesktopChanges- No changes allowed

NoInternetIcon - No Internet Explorer Icon on the Desktop

NoFavoritesMenu - Hides the Favorites menu

NoChangeStartMenu _ Disables changes to the Start Menu

NoFolderOptions _ Hides the Folder Options in the Explorer

ClearRecentDocsOnExit - Empty the recent Docs folder on reboot

NoLogoff - Hides the Log Off .... in the Start Menu.

Read more...

Creating Compurter Restore point and taking backup

Creating Compurter Restore point and taking backup

By this tweak you can restore your computer without formatting or reinstalling new OS

Creating Computer Restore Point
1. Start -> Run ->type %SystemRoot%\system32\restore\rstrui.exe, and then click OK.

2. On the Welcome to System Restore page, click Create a restore point -> Next .

3. On the Create a Restore Point page, type a name for the restore point and -> Create

4. After the restore point has been created, click Close.

Backup utility

1. Click Start -> Run -> type ntbackup.exe, and then click OK.

2. On the "Welcome to the Backup and Restore Wizard" page, click Advanced Mode.

3. Click the Backup tab.

4. On the Job menu, click New.

5. Click to select the check boxes for the drives that you want to back up. If you want to be more specific in your selections, expand the drive that you want, and then click to select the check boxes for the files or for the folders that you want.

6. Click to select the System State check box.

Read more...

Start computer in 10 seconds

Start computer in 10 seconds

Right heres what u have to do to turn ur pc on in 10 seconds :


Click on the start button then press R it will take u to Run well go to runand type Regedit
press enter
this will open Registery Editor
now look for the key

HKEY_LOACAL_MECHINE\SYSTEM\CurrentControlSet\Control\ContentIndex


now there find the Key Called
"Startup Delay"
Double Click On It
Now where its Base
Click Decimal
Now its Default Value Is 4800000
Change The Value To 40000
here u go u have done it
now close the Registery Editor and Restart Your Computer
You'll See The Result

Read more...

Powering on the Computer With Your Mouse

Powering on the Computer With Your Mouse

Here's the method by which you can start your computer by clicking your mouse button.

If you have ATX Main Board, ATX case Award Bios, or any Bios that supports PS/2 Mouse Power On, then you can power on your computer with a double click.

To activate this feature:

Restart your computer

Then press Del when the BIOS message appears to enter your CMOS configuration Select Integrated Peripherals from main menu
If PS/2 mouse power on disabled, activate it by press page up/ page down key it will became Double-Click
Press Esc key to exit
Press F10 to save and exit Power off your PC
Now double-click the left mouse button,.. Your PC will turn on

Read more...

Increasing XP shutdown speed

Increasing XP shutdown speed

Generally windows takes time to start and also it takes time to shutdown. I have already posted the method of increasing shutdown speed of computer. But, this is the easy way to fasten the shutdown speed.

Increasing shutdown speed by reducing wait times:
Windows XP stores a couple of values in its registry which are responsible for determining how long to wait before shutting down (killing) open applications and services once the shutdown command has been given.
By editing these two settings and changing them to lower values, you can considerably decrease the amount of time that Windows XP needs to successfully shut itself down. The first part of this tweak deals with setting the amount of time Windows will take to kill open applications on shutdown.
Open REGEDIT and navigate to 'HKEY_CURRENT_USER\Control Panel\Desktop\'
Highlight the 'WaitToKillAppTimeout' value.
Set it to '1000' (the default should be 20000).
Now highlight the 'HungAppTimeout' value
Set it to '1000' also.

Read more...

Add Safe Mode to Boot menu.

Add Safe Mode to Boot menu.

Safe Mode is most commonly used for troubleshooting purposes. If you find yourself booting to safe mode often. You may find it helpful to include the option for safe mode in your boot menu. Below, is a method you can use to save yourself from having to press F8 during startup to access Safe Mode:

-Right click My Computer and click Properties.
-Click the Advanced tab.
-Under Start Up and Recovery, click the Settings button.
-Click Edit. The boot.ini file will open in Notepad.


-Copy the line that reads as follows: multi(0)disk(0)rdisk(0)partition(2)\WIND

OWS=”Microsoft Windows XP Professional” /fastdetect.

Paste the line you just copied after the original one.
Change the copied line from “Microsoft Windows XP Professional” to “Windows XP Safe Mode” or something similar.
At the end of this line add the following: /safeboot:minimal /sos /bootlog.
Save the boot.ini file by clicking File then Save.
Restart your computer and Safe Mode should be available at the boot menu.
Note: Your actual Boot.INI may vary to a small degree. The above is an example only. Be sure to copy your boot.ini file prior to making any changes to it.

Read more...

Make your PC shutdown at a time you wish.

Make your PC shutdown at a time you wish.


There are two methods to make your computer shutdown at a time you wish.

METHOD 1:

1. Right click on your desktop and choose "New=>shortcuts".
2. In the box that says "Type the location of the shortcut",
type in "shutdown -s -t 3600" without the quotation marks and click next. Note: 3600 are the amount of seconds before your computer shuts down. So , 60secs*60mins=3600secs.
3. Make up a name for the shortcut and you're done.
You can change the icon by right clicking=>properities=>change icon=>browse
TO ABORT:
To make an abort key to stop the shutdown timer just create another shortcut and make
the "location of the shortcut" to " shutdown -a" without the quotes.

METHOD 2:
Here is another trick to shutdown at a specific time, for example you wish to shutdown at 11:35am. Type this in
start=>Run
Type Code: at 11:35 shutdown -s
TO ABORT:
Code:shutdown -a

Read more...

Removing Multiple Boot Screens

Removing Multiple Boot Screens

If you are getting unwanted multiple boot screen
Then Follow these Steps.

1> Right Click on My Computer

2>Select Properties

3>Select Advanced Tab

4>Select Settings In the Startup & Recovery Section(3rd grp)

5>Select the operating system which u want.

6>And Click OK.

7>Further again press the setting and click on Edit.

8>It will open boot.ini File.

9>Now u can delete those o/s which you don't want to be displayed.

Note: For deleting operating systems from boot.ini file, keep it mind that you can't
delete that o/s which is selected by default there. Before
making any changes make a copy of boot.ini file.

Read more...

How to convert a FAT partition to NTFS.

How to convert a FAT partition to NTFS.

Here is the simplest method to convert a FAT partition to NTFS.

Click Start ->click Programs-> click Command Prompt.

In Windows XP, click Start, click Run, type cmd and then click OK.

At the command prompt, type CONVERT [driveletter]: /FS:NTFS.


Convert.exe will attempt to convert the partition to NTFS.


NOTE: Although the chance of corruption or data loss during the conversion from FAT to NTFS is minimal, it is best to perform a full backup of the data on the drive that it is to be converted prior to executing the convert command. It is also recommended to verify the integrity of the backup before proceeding, as well as to run RDISK and update the emergency repair disk (ERD).

Read more...

About This Blog

  © Blogger templates The Professional Template by Ourblogtemplates.com 2008

Back to TOP